TeamCity for iOS project
- 18 minsHi! Today’s topic will be about TeamCity and how to provide continuous integration in your iOS project.

Motivation
I have configured a TeamCity many times and for many projects. There are many advantages of using Continuous Integration system in your project development process. Also, there is a lot of alternatives to TeamCity like CircleCI, TravisCI and many more. But in this post I want to share with you TeamCity experience that I have gained at Bright Inventions.
Every project that we start - we start from configuring Continuous Integration stuff and in our case we use TeamCity to handle that.
This post will be more like a tutorial that will guide you through all basic and most important steps in iOS project configuration. Also, I assume that you have already downloaded, and hosted your TeamCity service.
Hope you will like it!
Step 1: Create a root project
Firstly, you need to go to a page where your TeamCity is hosted. After loging-in, go to the Administration Page, click Projects tab in Project-related Settings section and click Create project

after that you should a see configuration screen for Version Control that is used in your project.

I prefer a way in which I will configure everything manually, but of course you can go with predefined sections like : From GitHub. From Bitbucket Cloud etc. All you need to do in this step is to provide a Name of your project and then tap Create
Step 2: Add VCS root
Of course, in order to build our project we need to provide sources to build. Our TeamCity service should be able to fetch changes from the repository. If you’re using a GitHub, BitBucket or platforms similar to these, you have two ways:
- Give credentials to account which has an access to the repository
or
- Generate a SSH key and use it to authorize TeamCity in GitHub/Bitbucket
In this post I will show you how to configure it with uploading SSH key.
Generate new SSH key
If you haven’t heard about generating SSH keys, or you don’t know what SSH keys really are, check this link
To generate new SSH keys you can use a terminal command:
ssh-keygen -t rsa
next, provide a name for new key, and an optional passphrase, then in the directory in which you run ssh-keygen -t rsa command you should see two files. One is a public key with .pub extension, and the second - private one. The public one will be used in your repository on github/bitbucket. The private key will be used in TeamCity service.
Use generated key in TeamCity
Go to an already created project, settings page and click VCS SSH Keys tab.
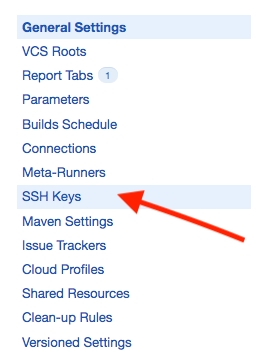
Click on Upload SSH Key. After that you should see a pop-up window which allows you to upload the previously created SSH Key. Please keep in mind that you should upload a private part of your key, without pub extension. If you choose correctly, click save and you should see a screen like this:

As you can see in Usage tab, the key is not used in the configuration yet. In order to use it - you have to go through the next steps…
Configure VCS root
Go to the already created project’s settings page. As you can notice in SSH Keys tab - appeared number ‘1’ - it means that we have one SSH key uploaded which is ready to use.
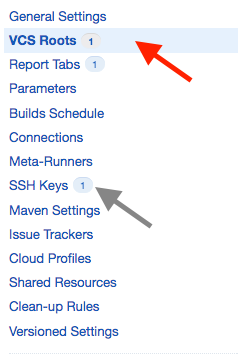
Click on VCS Roots tab, and then Create VC Root.
In our case, in Type of VCS select Git
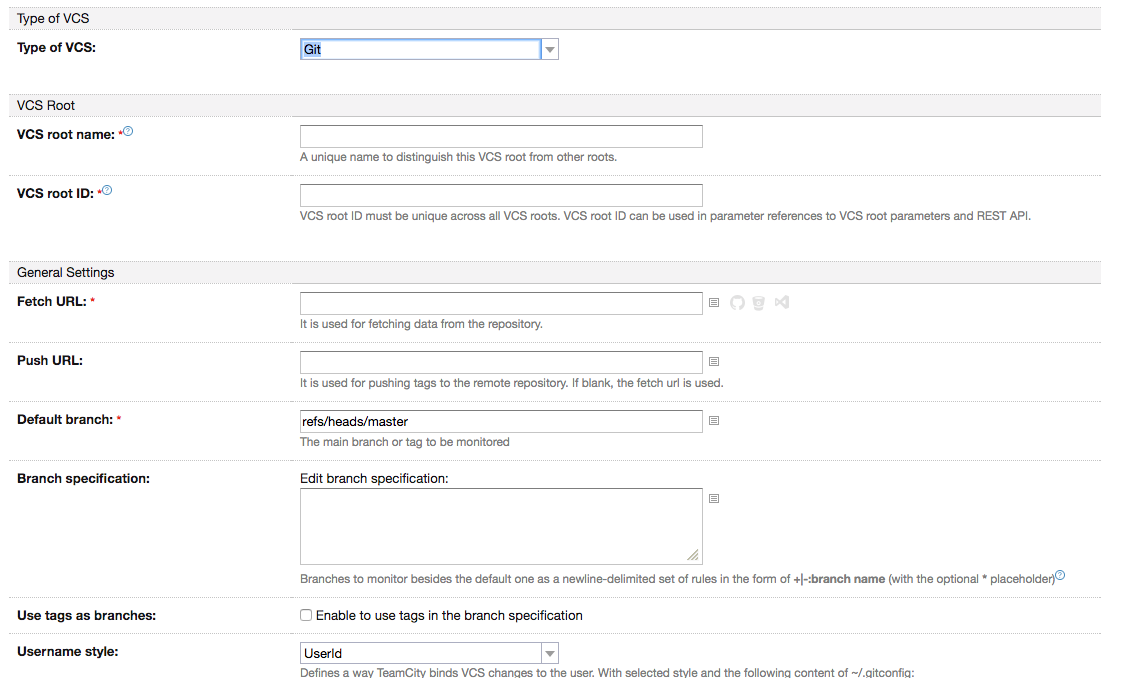
In VCS root name provide a name which will be:
A unique name to distinguish this VCS root from other roots.
Next, in Fetch URL paste a link to your repository. Please remember to paste here a SSH link type e.g [email protected]:yournickname/yourrepositoryname.git

Next, the most important thing, in Authentication method select Uploaded Key and choose a previously uploaded private ssh key for you repository.

Almost done. Now go to the end of the page and click Test Connection.
If you see screen like this:
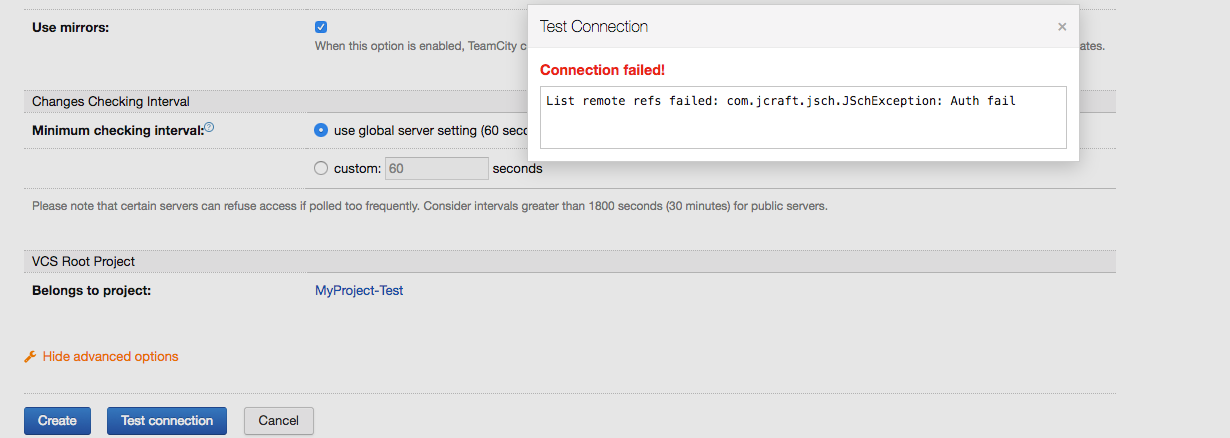
it means that our public part of generated SSH key is not used in the repository, and that’s why you get Auth failed error. So, all you need to do is to add a public part of SSH Key in Access keys or Deploy keys in your repository.
Here you have links for Bitbucket and GitHub instructions how to do that:
If you have successfully uploaded public part of SSH Key, click Test Connection again, and I hope you will be able to see Connection successful alert. It means that TeamCity has an access to read your repository.

Step 3: Create build configuration
Ok, our VCS is configured. Now it’s time to create build configuration in TeamCity project. Build configuration is a kind of lane which specifies what type of build you provide in this lane. It could be a lane for: compile your project and run unit tests or just compile a project or compile a project then create .ipa files and send it to iTunesConnect or even a separate lane for running UI tests.
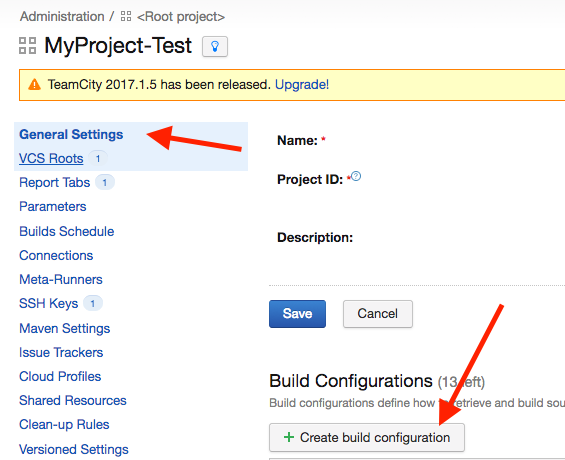
Go to General Settings in you already created project and click Create build configuration
In next screen, once again, choose Manually option and name your new build configuration. In our case let’s name it [Develop] Build & Test. The name is meaningful and means that our lane will build iOS project with develop configuration - Develop and also, provides an short information what this lane will do - Build & Test which means that we compile our project and run unit tests.
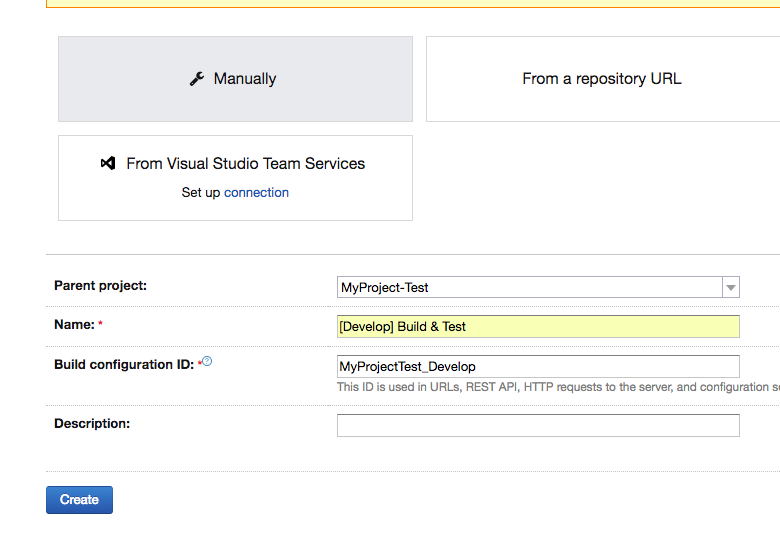
Click Create and after that you should see:

Here, select a previously created VCS Root and click Attach.
All done, our build configuration is connected with VCS.
Step 4: Configure build steps for configuration
Now it’s time to define steps in our build configuration. What are the build steps? They are a sequence of instructions which TeamCity will run on our agent machine. Put it simply, it could be something like:
- Fetch new changes from repo
- Install dependencies (cocoapods, bundle install and stuff like that)
- Compile project using script (xcodebuild, fastlane)
Please remember that build steps depend on how you configure your iOS project. In my example I used Fastlane, and Bundler to manage versions of gems installed in iOS project.
In order to create build steps go to Build configuration Settings and tap Build Steps

Click on Add build step, and on the next screen select a Command line runner type. In Step name name your build step(in my case it will be Install Dependencies). In Custom script type a script that will be executed in this build step. Again, in my case it will be
bundle install
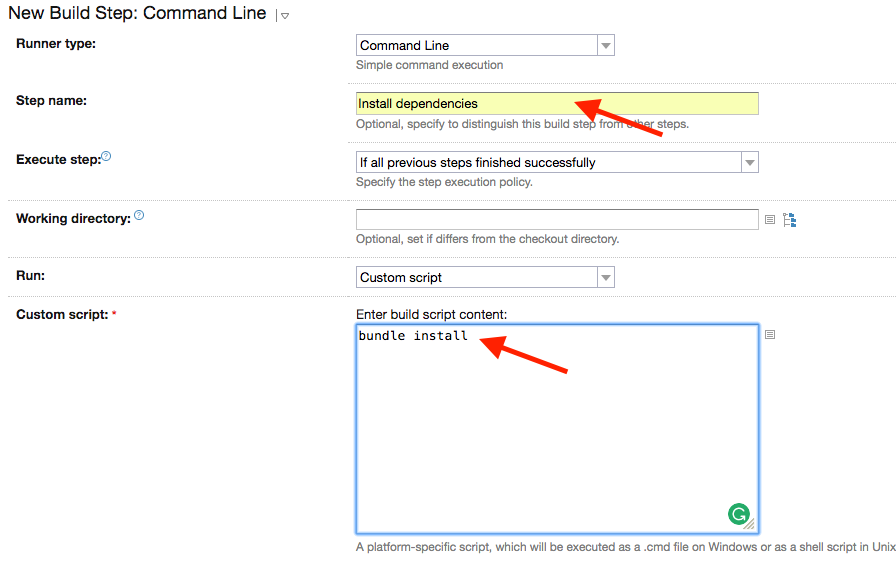
click Save and your first step is ready!
I also added another command line build step called Build and tests which will run command:
bundle exec fastlane build_and_test
build_and_test is the name of the lane in Fastfile. If you’re not familiar with Fastlane, please have a look at this. It’s a great tool Fastlane
So, now we have all build steps created.

Step 5: Triggers
Have you ever wondered how TeamCity knows when to fetch new changes from the repository and build it? Triggers is an answer.
I prefer to use two types of triggers. One of these is called VCS Trigger which means that TeamCity checks automatically if something has changed in your repository and if this is a case then it will start a build configuration which contains that type of trigger. VCS Trigger is used in the configurations like Compile & Test for example. Because we want to compile and run tests after every push to the repository.
The latter trigger, is called Schedule Trigger. It is a simple trigger which could say : Run this configuration at every Monday at 7:00AM
Go to Triggers section in Build Configuration main page. Click Add new trigger and select VCS Trigger and simply click Save
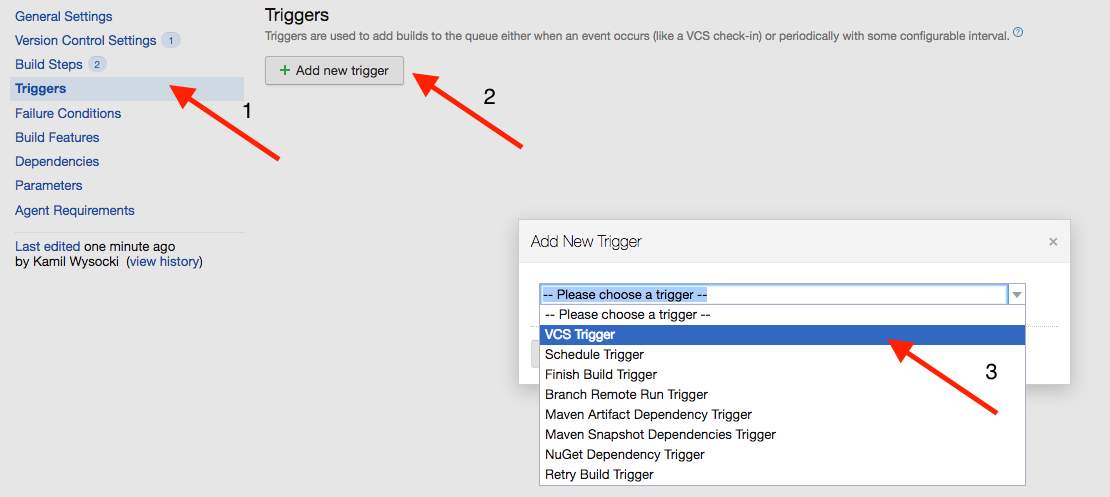
VCS Trigger configured successfully, easy right?.
Next, do the same, Add new trigger -> Schedule Trigger and choose options that will meet your requirements (in my case it is a daily trigger at 04:00 AM) and click Save.
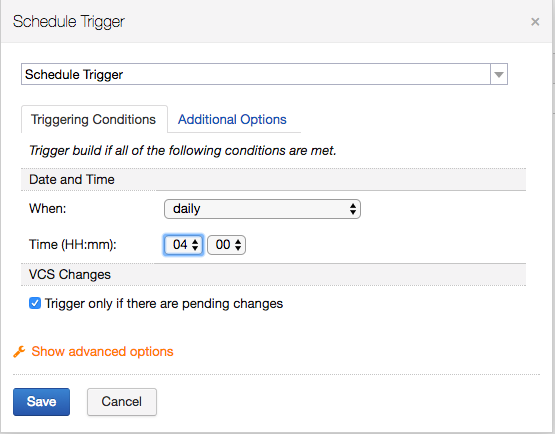
All triggers created!
Step 6: Add Build Features
Build features are cool stuff. For example, while using build features you can create a condition that checks which version of Ruby is installed, or you can create a condition that will check if there is some available space on your machine. It is super useful if you want to produce .ipa files and you know that you need at least 100MB free space. In this post I will show you how to configure two build features - one is XML report processing and the second one Ruby environment configurator.
XML report processing
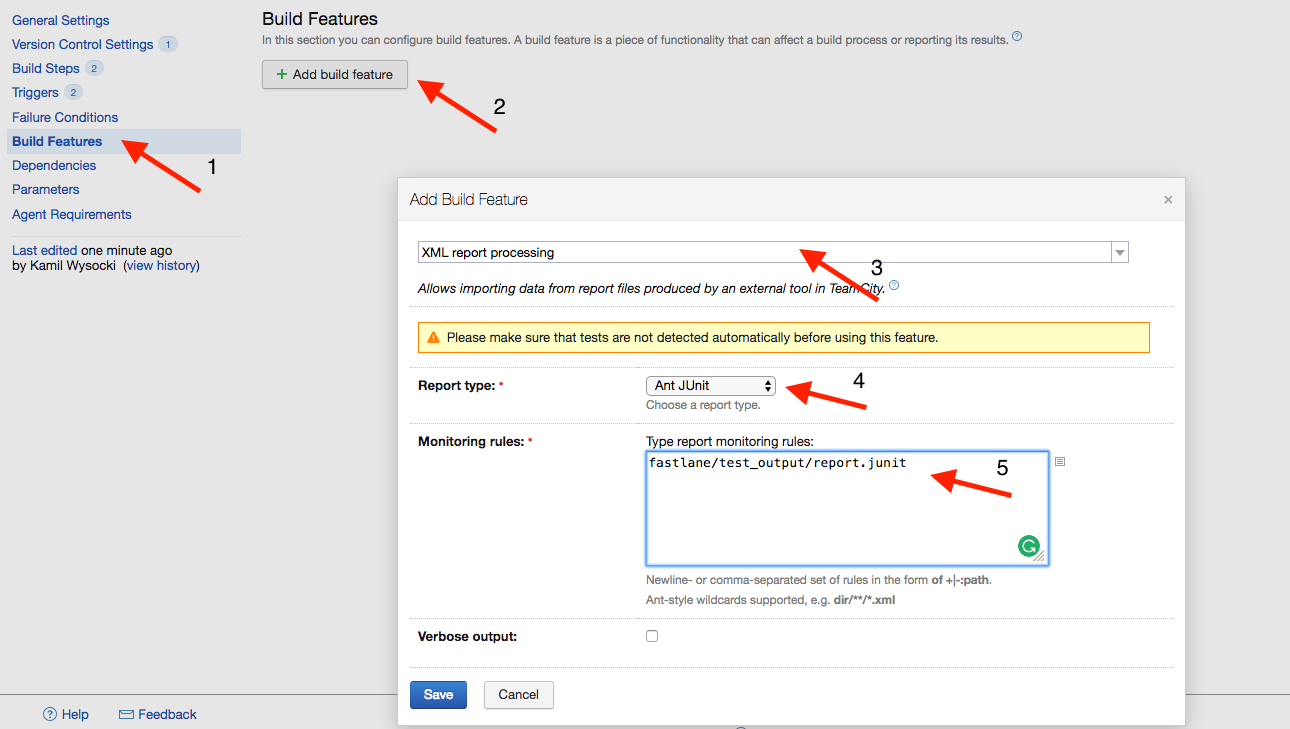
Go to Build Features section in the build configuration main page, and click Add build feature. Choose XML report processing, select Ant JUnit and in Monitoring rules paste a path for report.junit file which is generated by Fastlane after scan action. In report.junit you can find out how many tests have been run, how many tests failed, how many tests have been completed successfully.
Ruby environment configurator
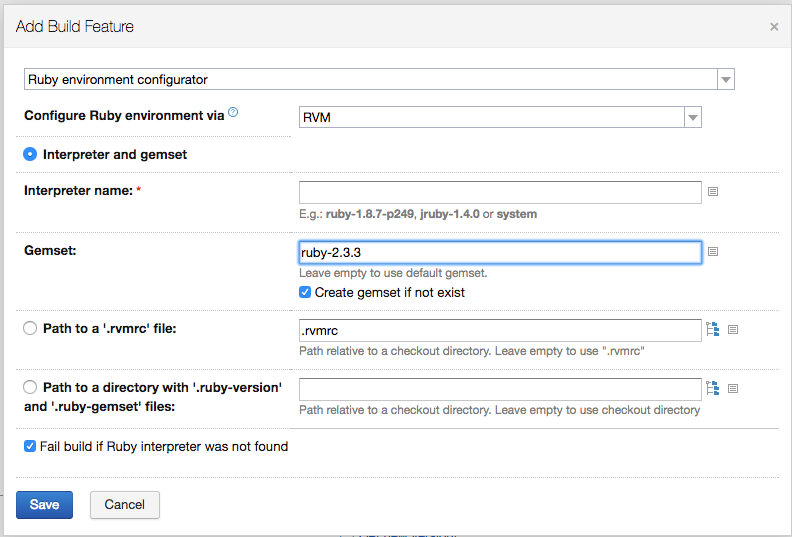
This time select Ruby environment configurator in Add build feature window. In gemset define which ruby version you need to have. In my case it was ruby-2.3.3.
This feature will check if this version of ruby is available on the agent machine and if not it will not start build configuration. It is an optional step, but sometimes it is incredibly useful - especially, if you use multiple ruby versions or someone else could change a global version of ruby on agent machine.
Step 7: Parameters
There are 3 types of parameters for build configuration or even root project.
-
Configuration Parameter
-
System properties(system.)
-
Environment Variables(env.)
In this post I will focus on Environment variables. That type of variables are created after build start(is ready?) and they can be accessed via Command line with $ prefix. One example of Environment variable could be an XCode path. In order to compile our project we need XCode path which will be used by Fastlane tool. So in Fastfile I add line:
xcode_select ENV["XCODE_PATH"]
which means - select XCode from a path that you can find under ENV["XCODE_PATH"] variable.
On the build configuration main page select Parameters and click Add new parameter. In Name type env.XCODE_PATH, TeamCity should automatically change Kind to Environment variable and in the value provide a path to XCode.app on your agent machine.
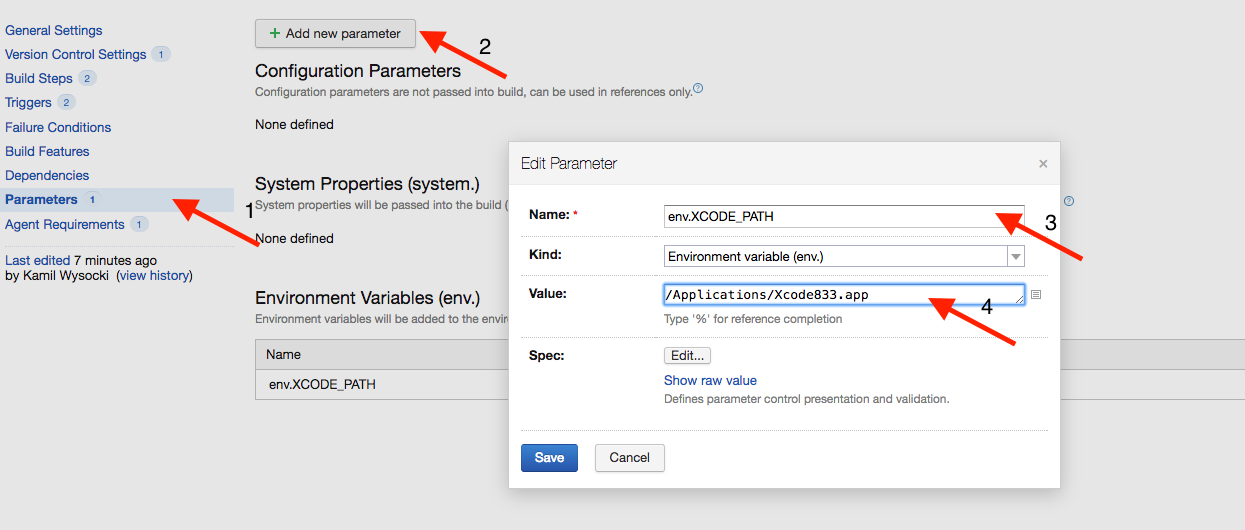
By using parameters you can pass many useful values such as your build number or the name of scheme that should be built and many more. I encourage you to check it out :)
Step 8: Failure Conditions
Failure conditions should be used in a situation when you want to force your build to fail. A great example of that is a timeout. Let’s imagine that something bad happens on your agent machine and your build is hanging over 2 hours, when normally it takes a few minutes. Failure conditions come with help! You can set up here that if build lasts above n minutes then it should fail.
In the main page of build configuration go to Failure Conditions and on line if runs longer than specified limit in minutes put a value(in minutes). In my case it will be 60 minutes.

Step 9: Agent machine
As you have probably noticed, I often mention agent machine. Agent, in iOS case, it is a computer(Macbook, MacMini, etc) with macOS system. Agent is connected via script to your TeamCity page. TeamCity can communicate with agent in order to use it to execute build steps from build configuration. The important thing is that your agent should be turned ON all the time to provide continuous integration.
Ok, but how to configure an Agent?
Go to Agents tab in TeamCity page. You can find it at the top.

In a newly created TeamCity there are no available agents yet. Let’s click on Install Build Agents.

I prefer a way of installing it via Zip file distribution. After you click on that your web browser will download all the files that are necessary to run agent.
Great instruction how to configure Mac agent you can find in TeamCity docs here. Below are the steps from this documentation:
1.Make sure a JDK (JRE) 1.8 (versions 1.6-1.8 are supported, but 1.8 is recommended) is properly installed on the agent computer.

2.On the agent computer, make sure the JRE_HOME or JAVA_HOME environment variables are set (pointing to the installed JRE or JDK directory respectively).

3.In the TeamCity Web UI, navigate to the Agents tab.

4.Click the Install Build Agents link and select Zip file distribution to download the archive.

5.Unzip the downloaded file into the desired directory.

6.Navigate to the <installation path>\conf directory, locate the file called buildAgent.dist.properties and rename it to buildAgent.properties.

7.Edit the buildAgent.properties file to specify the TeamCity server URL and the name of the agent. Please refer to Build Agent Configuration section for details on agent configuration.

8.Under Linux, you may need to give execution permissions to the bin/agent.sh shell script.
After these steps you can start the agent via command:
pathToDownloadedUnzippedBuildAgentFiles\bin\agent.sh start
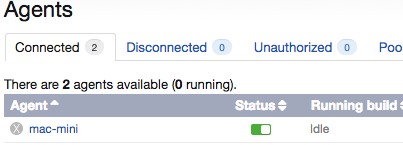
The next thing to do is to go to TeamCity page on Agents tab again. You will have to wait a bit, and after some time you should see one agent available under Unauthorized tab. Only thing to do is to Authorize agent. After this you will see you agent under Connected tab.
Step 10: Setup Agent requirements for build configuration
The last thing…You need to specify now which agent should build your configuration. If your TeamCity contains a projects for iOS and Android, probably it will have two agents - one for Android, and the second one for iOS. Of course, we don’t want to start our iOS build configuration on computer for Android project which probably will not have XCode, or even macOS. So, in order to provide a proper agent for you project you need to use Agent requirements for build configuration.
In the main page of build configuration go to Agent requirements tab and then:
- Select
Add new requirement - In
Parameter Nametypeteamcity.agent.jvm.os.name - In
Conditionselectequals - In
ValueselectMac OS X - Save
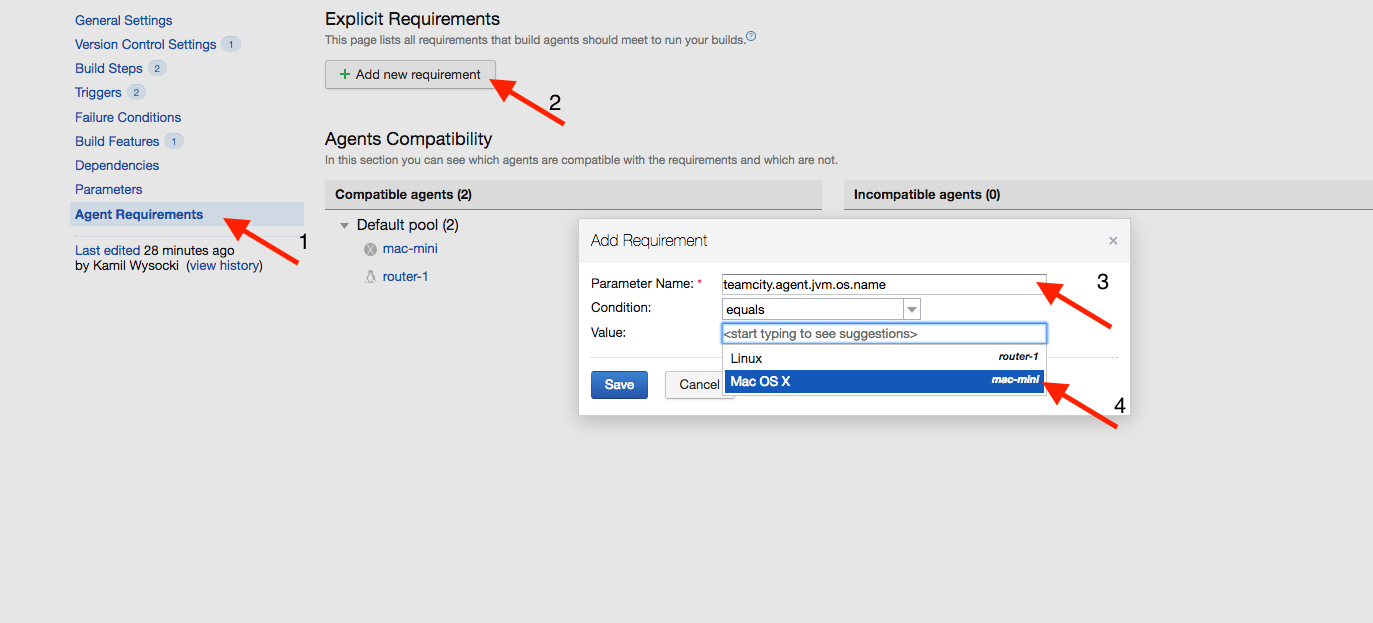
The requirement which we have already created means that agent OS name should be Mac OS X because we configure a project for iOS.
Step 11: Ready for build - RUN! 🎉
All configured, you’re ready to start your build via TeamCity. Go to main TeamCity page and tap Run on your freshly created build configuration.

After that, you will be able to see build progress:

If you want to see the progress in a current build, just click on Running label and go to the Build log section. It is very useful if some errors occurred while compiling.
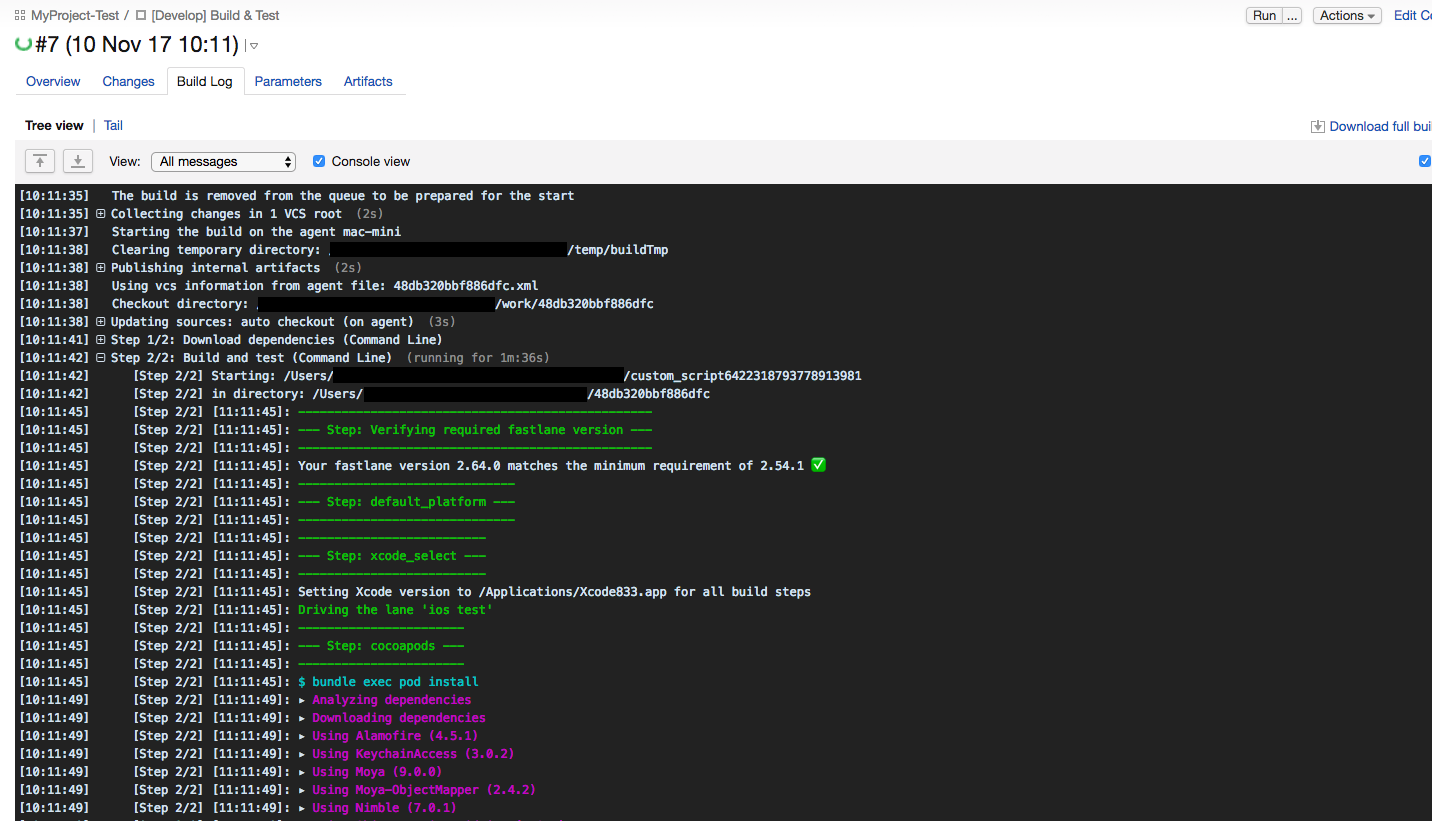
Finally, after all build steps you will be able to see:

As you can see, XML Processing Report Build Feature provides a cool output about unit tests: Test passed: 24.
Step 12: Artifacts!
Last optional step. I can imagine that you can find many cases that you want to compile a project, create a .ipa file and send it to the client. Artifacts are made for it. To do this: Go to build configuration settings by clicking Edit Settings:
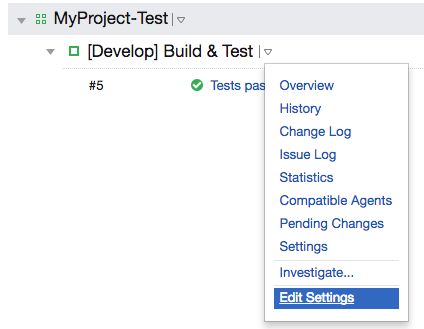
in General Settings under Artifacts paths type a path to .ipa file which will be generated by your build scripts. I recommend using Fastlane again. Fastlane action called gym will build your project and create .ipa file in the output directory. More about gym you can read here.

If you do this, after next build you will be able to download .ipa via Artifacts page on TeamCity.

Conclusion
TeamCity is a great platform to provide Continuous Integration in your project. In combination with Fastlane it saves you many hours of manual deploying, testing and compiling.
Also, if you will configure Artifacts in build configuration, you can easily send a link to your TeamCity page to your client, and give him instructions how to download the .ipa with a few clicks. So, you don’t have to worry about sending .ipa files every time you create a new file version.
Hope you like the post. Feel free to share :)
This post was primarly posted on my company blog
